|
Create Slide Show with Image Files and/or Web Pages
With E2,
you can view images, web pages or groups of images sequential on screen as a
slide show. Images can be from different sources as local, network, or
internet. The steps below will help you to create a slide show:
A. Create PLAYLIST
-
Open the
Playlist - From View Menu select Play List or click on
Show/Hide Playlist button (No 11 -Figure 1)
-
Change
Playlist to SLIDE SHOW MODE - Use the Change Collection Mode
button (No 2 or No 14 - Figure 1)
-
Add Files to the Playlist - Use buttons (No 3 to
No 8 - Figure 1) in
the Playlist Toolbar to add files. You can also drag and drop image
files from Windows Explorer directly into the Playlist.
-
Modify Playlist if needed with Playlist Edit
Bar (No 12 - Figure 1)
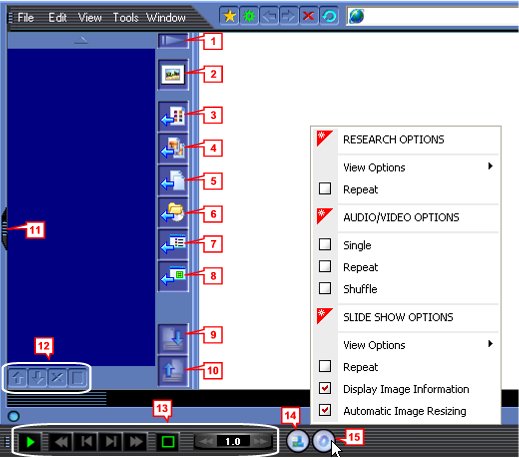
Figure 1
Button 3: For Internet Image Files - Add all
links to image files on page (use for page with thumbnails)
Button 4: For Internet Image Files - Add all
images on page
Button 5: For Local, Network Image Files -
Add single or selected files
Button 6: For Local, Network Image Files -
Add all files in a folder or CD (with option to add sub-folders)
Button 7: For Web Pages - Add all links on
current active page
Button 8: For Web Pages - Add all links on a
selected area
B. Set Delay Time
Adjust delay time (default setting is 1 second) - use timer in Multimedia Control Bar
(No 13 - Figure 1). In E2, delay time does not count the loading time (or download
time)
C. Start the Show
-
Click on
the Play button in Multimedia Control Bar (No 13 - Figure 1)
-
Close Playlist if you need more space for the
display.
To view a group of images - Open Media Menu
(No 15 - Figure 1) - under Slide Show
Options - select View Options and then View Set....
Document No. 010007 |
